
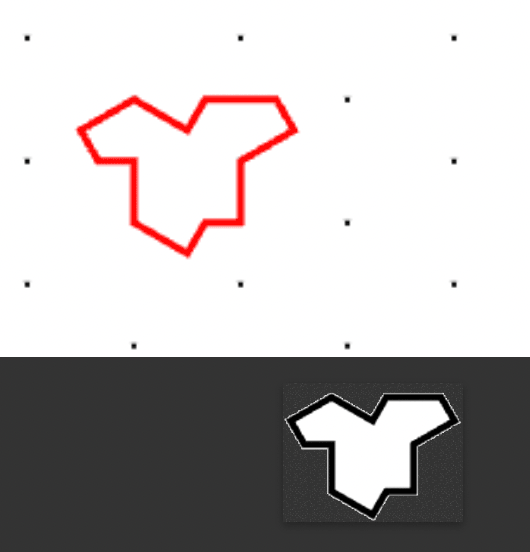
Lesson 1:
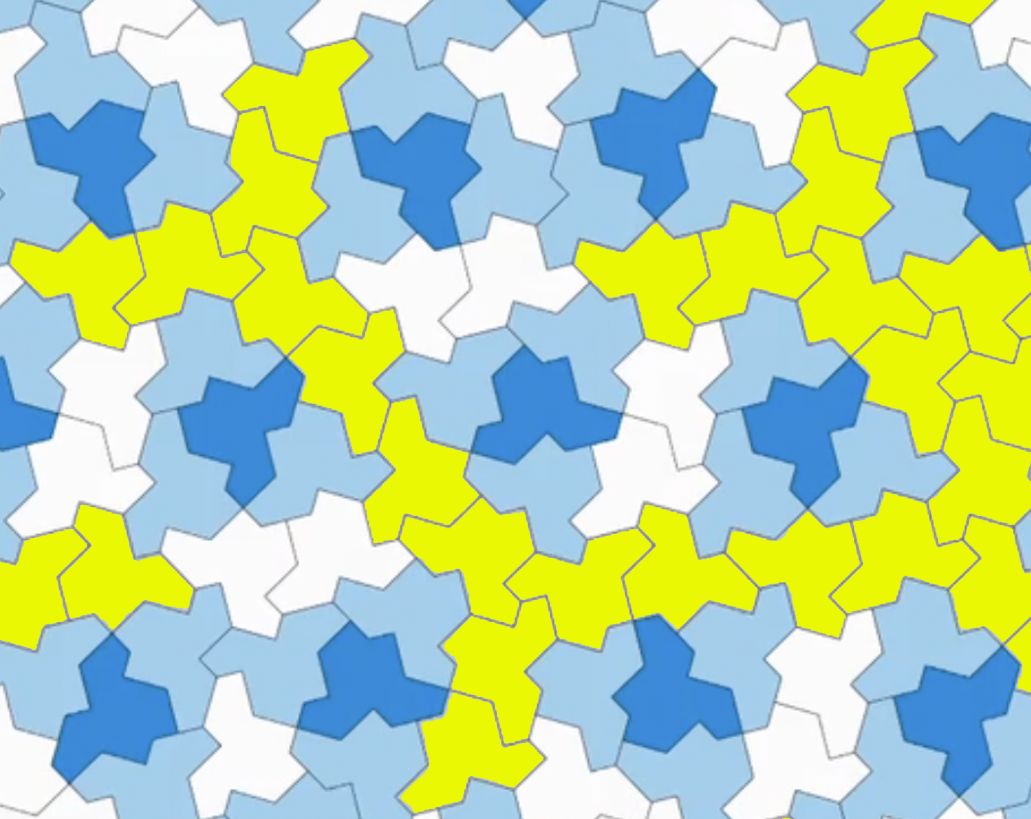
T-Shirt is a shape that "exhibits aperiodic tiling". That's a fancy way of saying you can lay them down next to each other, with no gaps between, forever, and never see a repeating pattern. Learn more about tiling and its history here.
And T-Shirt is a jigsaw puzzle, with no picture to guide you. On the other hand, every piece is exactly the same shape. So maybe it's an easy puzzle?
Actually, completing a 200 piece T-Shirt puzzle without any training is very hard. If you want to try first without any help, click here.
Or continue through some learning challenges and you'll be a pro in no time.

Lesson 2:
This lesson is easy. Drag four T-Shirts into the puzzle space
Click and drag the small T-Shirt in the tool bar and place it in one of the red targets.
Fill all four targets. Click Ok to start.
Lesson 3:
Drag four T-Shirts into the puzzle space
This time you'll have to rotate them to fit.
Lesson 4:
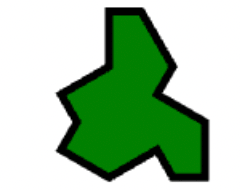
These puzzle pieces can be flipped over, upside down, making a mirror image, or what mathematicians call a reflection.
'F' will flip upside-down, and press 'F' again to get back right-side up.
One key insight to the T-Shirts Puzzle is that very few T-Shirts are ever flipped over to the blue side.
Congratulations, you've earned some new tools to make things easier. Select more than one T-Shirt by shift-clicking. Double click quickly selects all T-Shirts contiguous with the one double-clicked. Continue to drag selected T-Shirts or move the selection using the arrow keys. Zoom In using the = or + keys, zoom out using - or _. To delete the selection, press x. Of course T and R continue to rotate the selection and F continues to Flip it.
Click: Select a T-Shirt
Shift-Click: Shift-click to add or remove a T-Shirt from the selection.
Double-Click: Select all contiguous T-Shirts.
Arrows: Move selected T-Shirts up, down, left or right.
- or _: Zoom out
= or +: Zoom in
x: Delete selected T-Shirts
T and R: Rotate selected T-Shirts clockwise or counter clockwise
F: Flip selected T-Shirts
Try out the new commands then click the ? to return here and continue to the next lesson.
There are over 190 unique ways to connect just two T-Shirts with each other. You may have noticed some pairings cause problems now, or down-the-line.
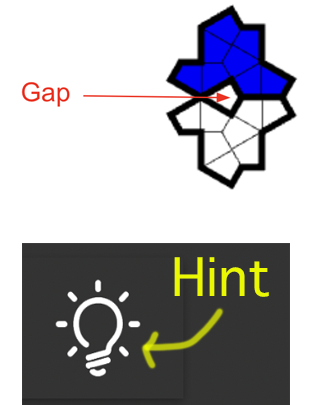
Lesson 5:
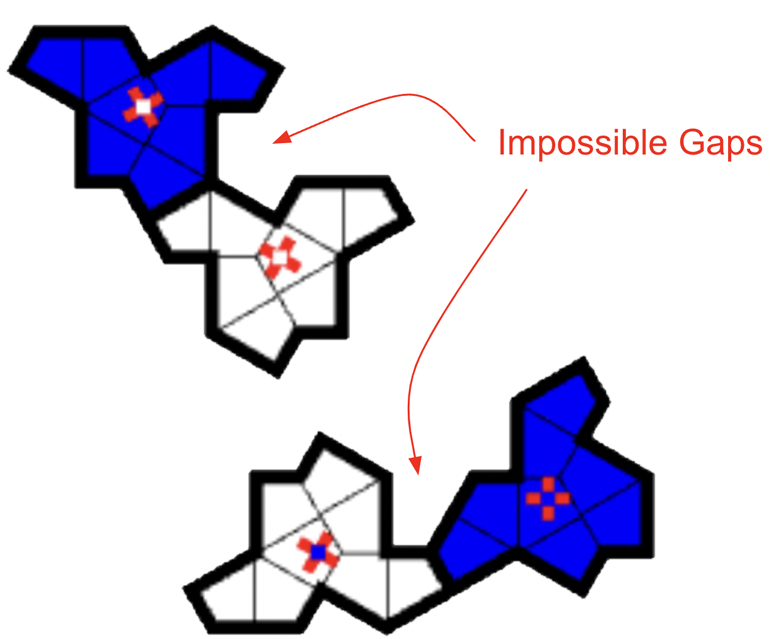
Some pairings will leave gaps that are impossible to fill, for example.
See if you can take 6 T-Shirts and construct 3 pairs of T-Shirts each with a distinct small gap between them.
Connect one pair neck-to-neck (as shown), another neck-to-armpit, and a third armpit-to-armpit.
Click the Hint-light bulb if you want more help.
You've earned the 'bad pairing' flag! It isn't always obvious when two neighbors are poorly arranged, but the red flag will alert you.
Bonus!
From now on, if you connect two T-Shirts in any of 13 known bad pairings, you will see a red X appear in the middle of each T-Shirt, warning you to change one or both of them.
You can see all known bad pairings here.
You are now ready for the First Challenge!
You have all the basic tools: add, move, rotate & flip. Now, see if you can completely "tile" (cover with no gaps) the area inside the black rectangle.
Challenge Level
Warning: you haven't had strategy lessons yet, so this will be very hard. But it can be good to see why it's so hard.
If you want to stop and come back to this guided lesson-by-lesson approach, click on the big ? to return here. You can skip the challenge and proceed with the intermediate lessons.

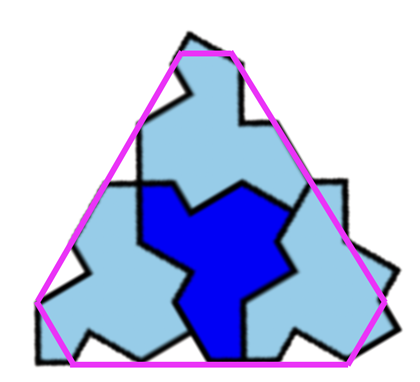
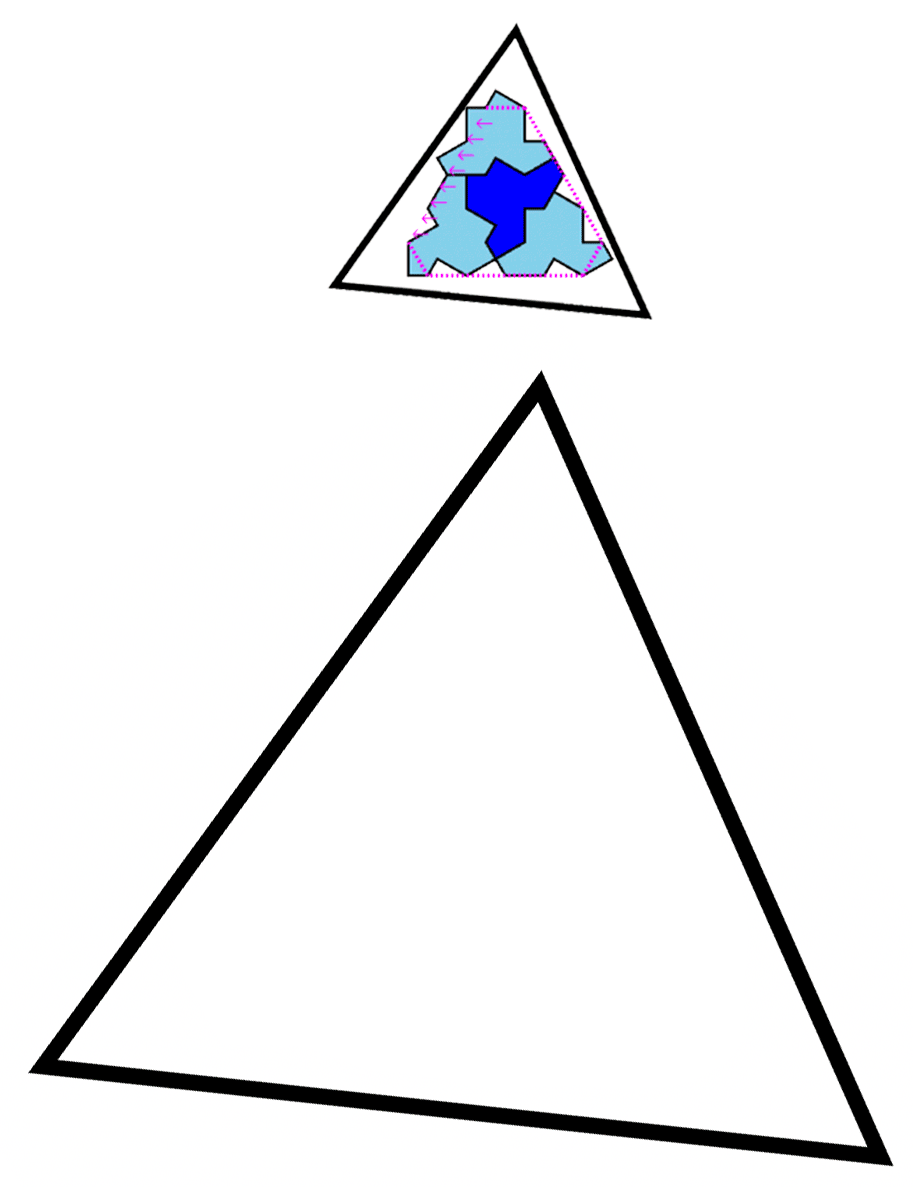
"The Cluster" is an important (and often used) grouping of four T-Shirts.
Lesson 6:
Flip one T-Shirt over to the blue side, then surround it as completely as possible with 3 non-flipped (white) T-Shirts
To successfully tile an area with T-Shirts, flipped tiles must always be surrounded exactly like this.
Also, notice how a Cluster forms a rough triangle as shown by the purpline lines.
Click the Hint lightbulb for more help.
Now you can really make progress by seeing larger shapes within the puzzle.
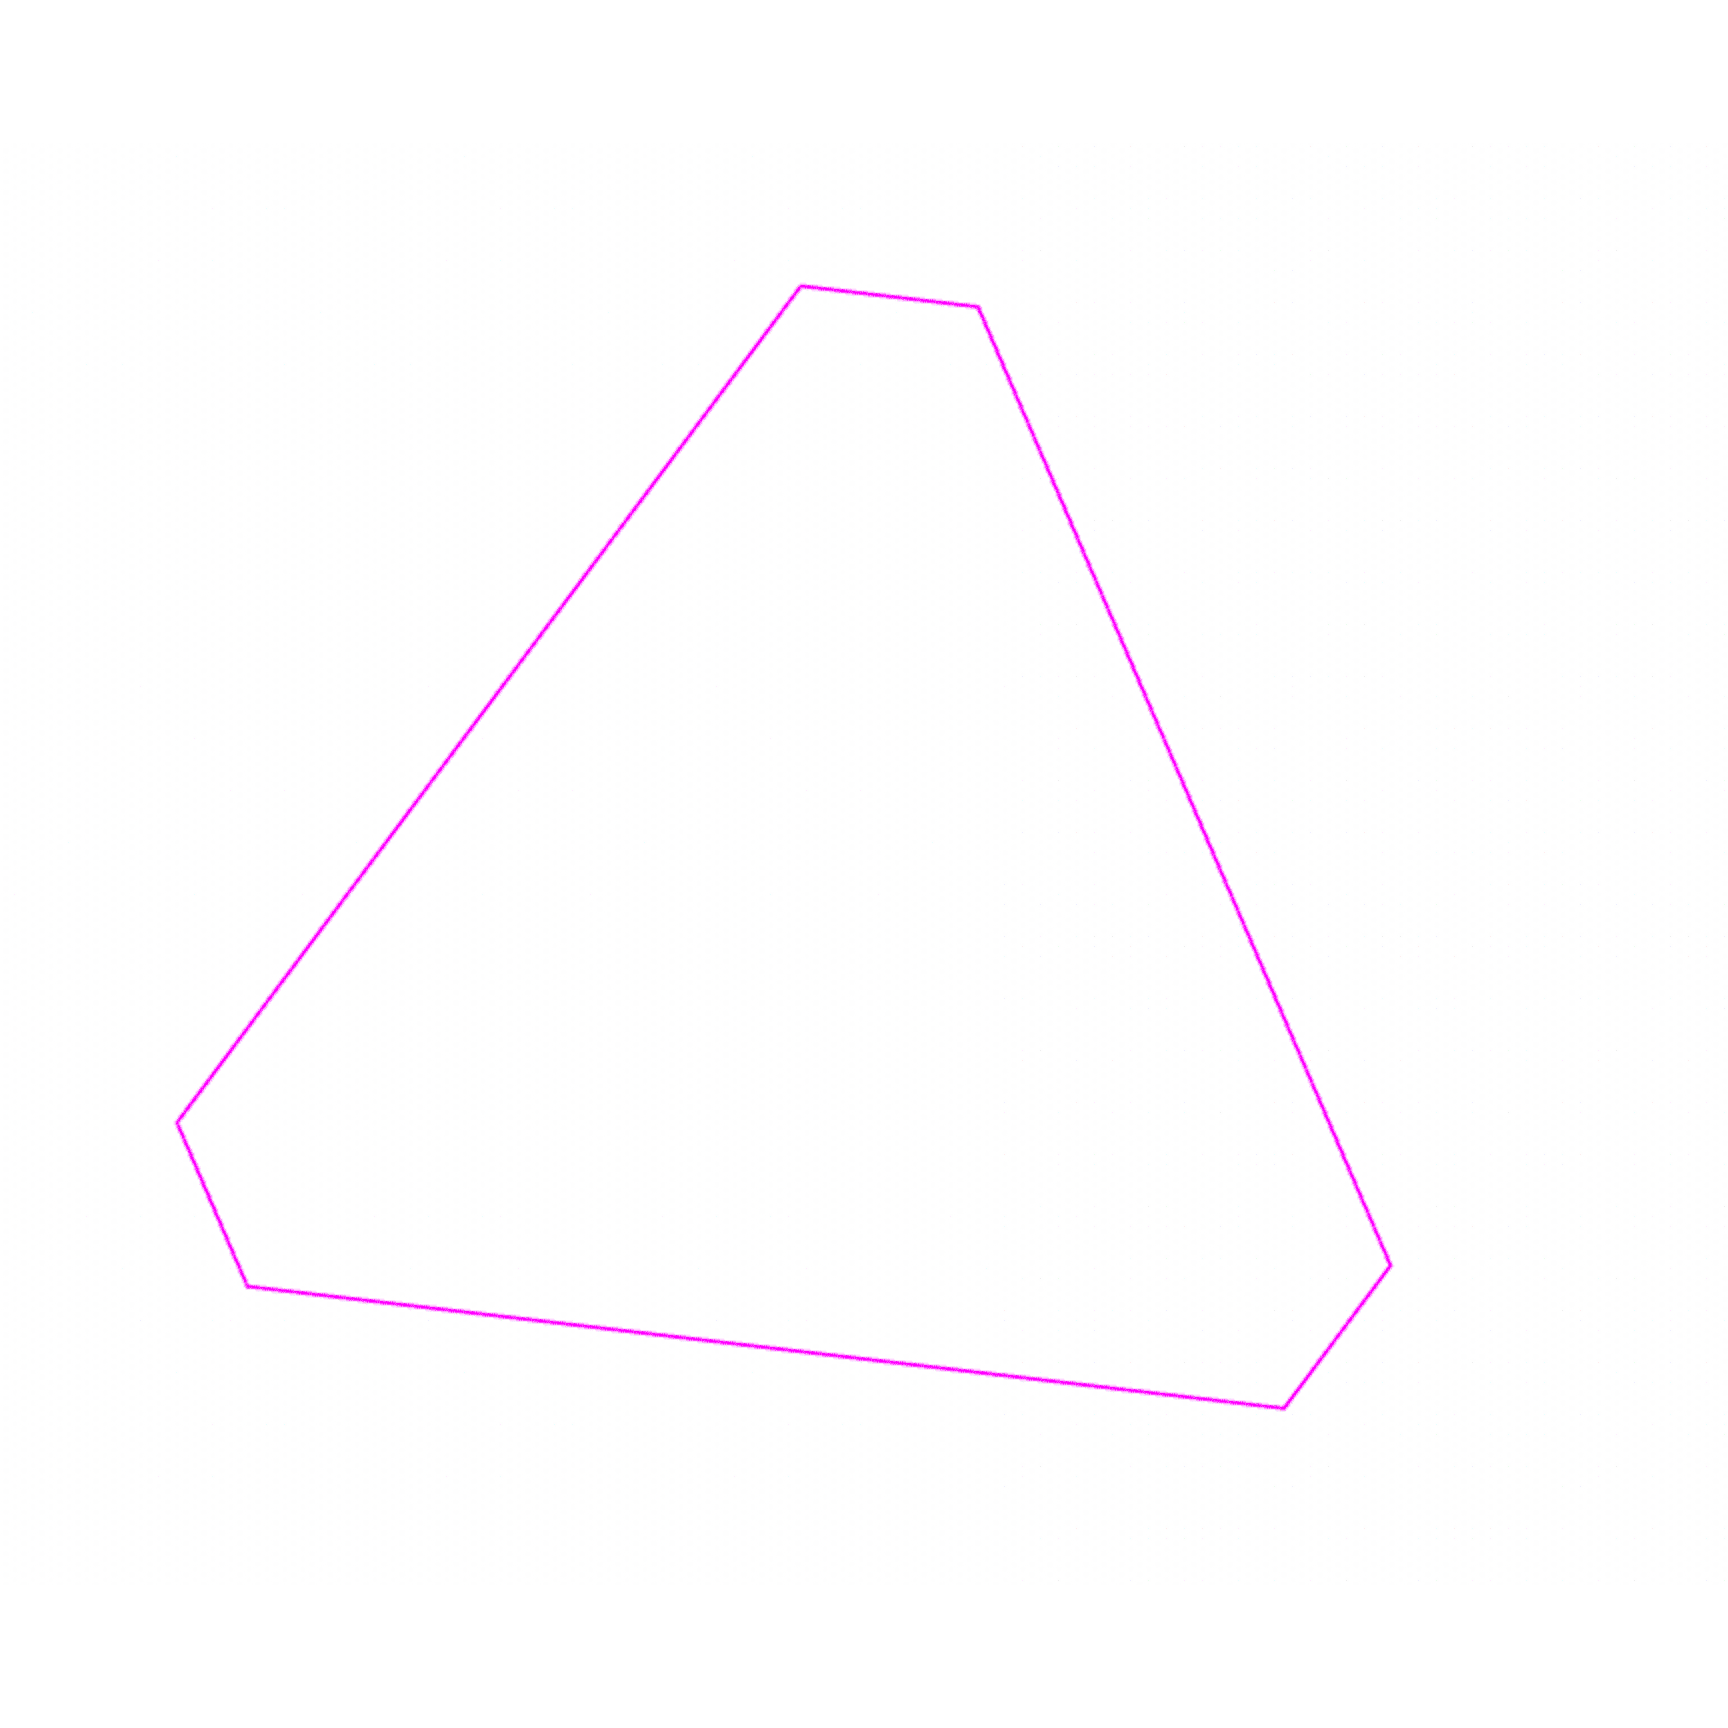
Lesson 7:
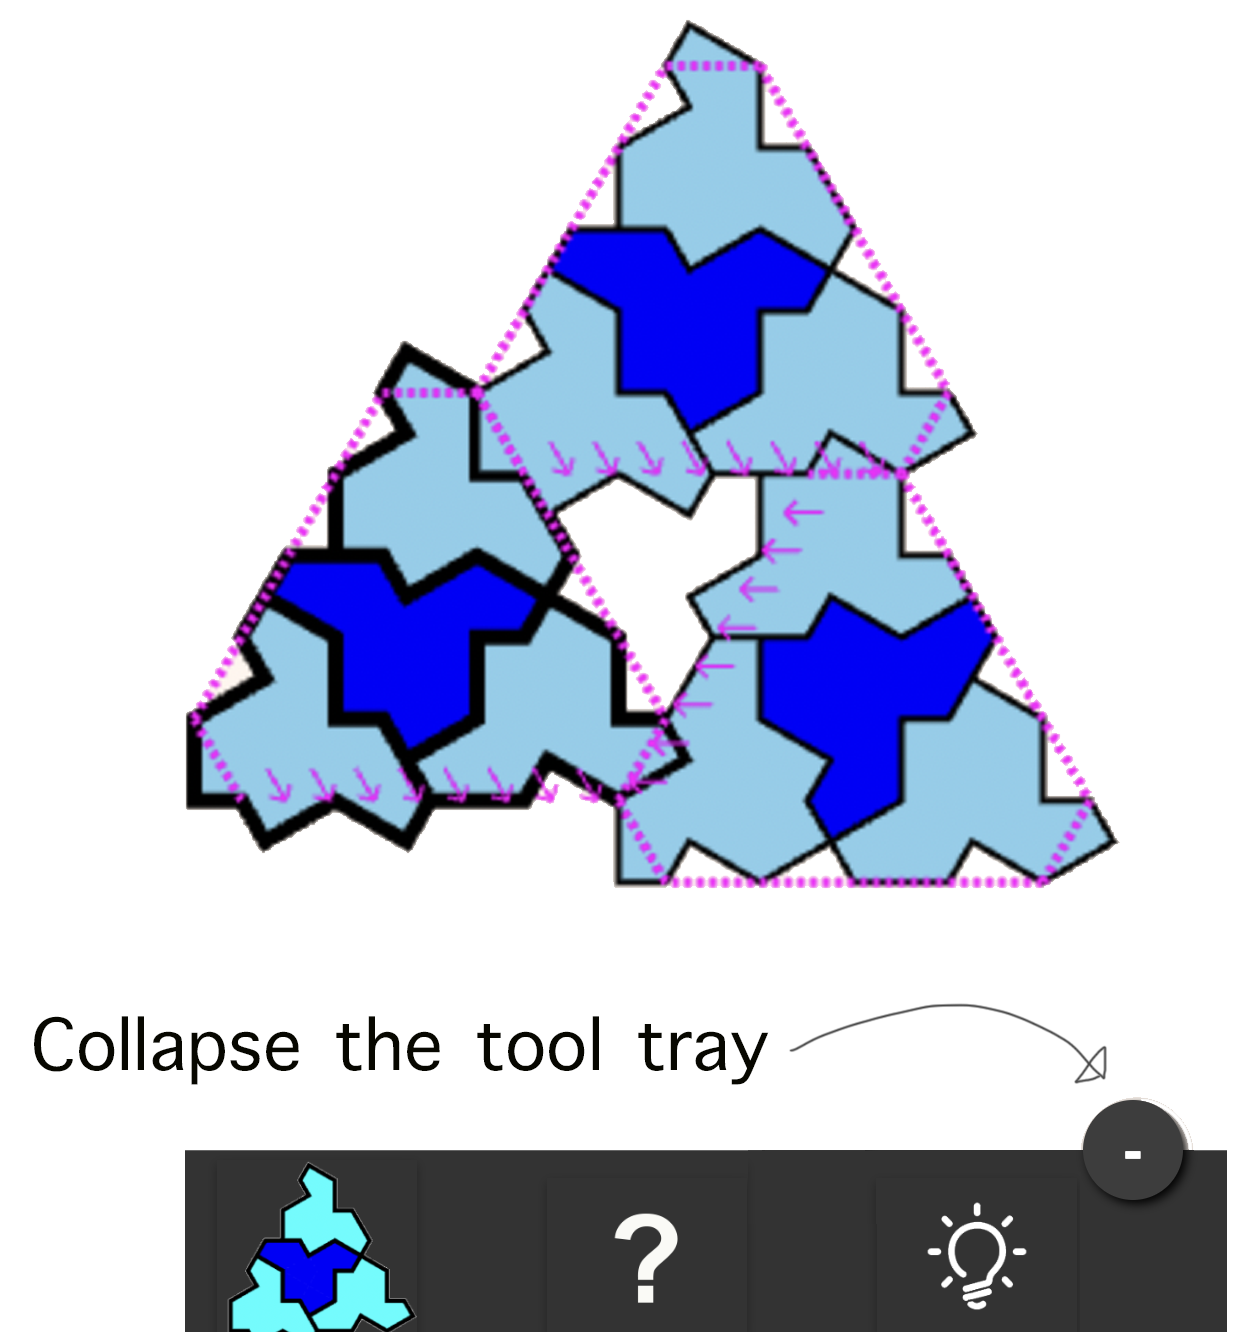
Using the new Cluster tool, see if you can layout three Clusters to form a rough triangle with one T-Shirt between them.
Notice the new style of hints with just a rough shape. These are key to seeing patterns later. The arrows help with orientation, indicating where the T-Shirts can exceed the shape's boundary. Detailed hints are still available, just keep clicking the lightbulb.
If you need more room to see, collapse the tool tray.
Lesson 8:
The next common combination is a simple one. It involves just two, regular, (non-flipped) T-Shirts.
Connect two T-Shirts side-by-side so they share 4 points. It will look like two buddies, arm-in-arm.
Just like life, Buddies are very common. In fact, every T-Shirt should be part of a Buddy pair, with just two exceptions:
Lesson 9:
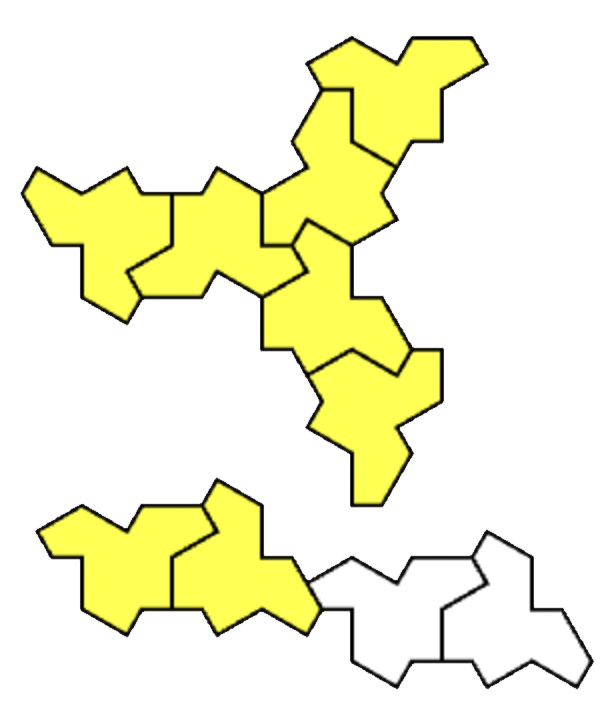
Buddies are the glue connecting Clusters to form larger super clusters.
Often between Clusters we see lines of Buddies like those in yellow here. These lines branch out at 120 degree angles from each other.
Where three buddies meet together in a three-armed propeller shape, it's called a triskelion.
Use the new Buddies tool to quickly create lines of Buddies joined in a triskelion.
Depending on placement, some Buddies that don't connect just right to a line will be colored white instead. More about that later.
Lesson 10:
When three pairs of Buddies meet, arms locked, in a rotation like this, it is called a triskelion. Each of the three Buddies is called a triskelion leg. On large, completed puzzles you will often see triskelions connecting long chains of Buddies.
When two Buddies instead meet "armhole to sleevetop", it prevents the three-way branching. This type of pairing will be referred to as "disjoint".
Both triskelion legs and disjoint Buddies are identical if you see them in isolation. It is how they connect to other Buddies that determines their status.
Congratulations, you've earned some new styles to mix things up artistically if you like.
Press the C key to switch between 3 different color palettes and press the G key to switch between different T-Shirt designs including plain white, kite-outline and a new Penrose Curve style developed by Pembesita on YouTube.
C: Cycle through three different color palette's
G: Cycle through three different T-Shirt styles
D: Toggle on/off the dots at the hexagonal grid points
Try out the new commands then click the ? to return here and continue to the next lesson.

Challenge Level:
So far you've learned a few pretty useful things. Let's review.
Avoid Bad Pairings: If you put two tiles together in a way that leaves a gap that can't be filled, you'll get a red X warning on both T-Shirts.
Only Flip In a Cluster Only about 14.5% of the time (or 1/phi^4) will you ever flip a T-Shirt. And when you do, it should be surrounded in a very specific way to form the Cluster. Never flip a single T-Shirt over.
It's Mostly Buddies and Clusters Even fewer T-Shirts will be lone (non-Buddies, non-Cluster) T-Shirts. The only time you should place a single, white T will be when you have three clusters surrounding it, like you did in lesson 7.
Buddies Surround Everything Buddies are the glue that hold things together. Generally every Cluster or Multi-Cluster is surrounded by Buddies.
Hint: Start with a Multi-Cluster, Then Surround It With Buddies!
Click "Ok" to take this challenge. Now see if you can completely cover the area inside the black rectangle with T-Shirts. It will still be quite challenging, but flex your skills. Or go to the next lesson to begin advanced lessons on higher level strategies.
Lesson 11:
Tiling T-Shirts in large numbers requires seeing patterns at different scales. But mathematicians have proven you will never find a pattern of T-Shirts no matter how large an area you tile.
So, how is it possible? It turns out, there is a pattern of symbolic shapes one can substitute for actual T-Shirts. The shapes have a pattern, even if the T-Shirts don't.
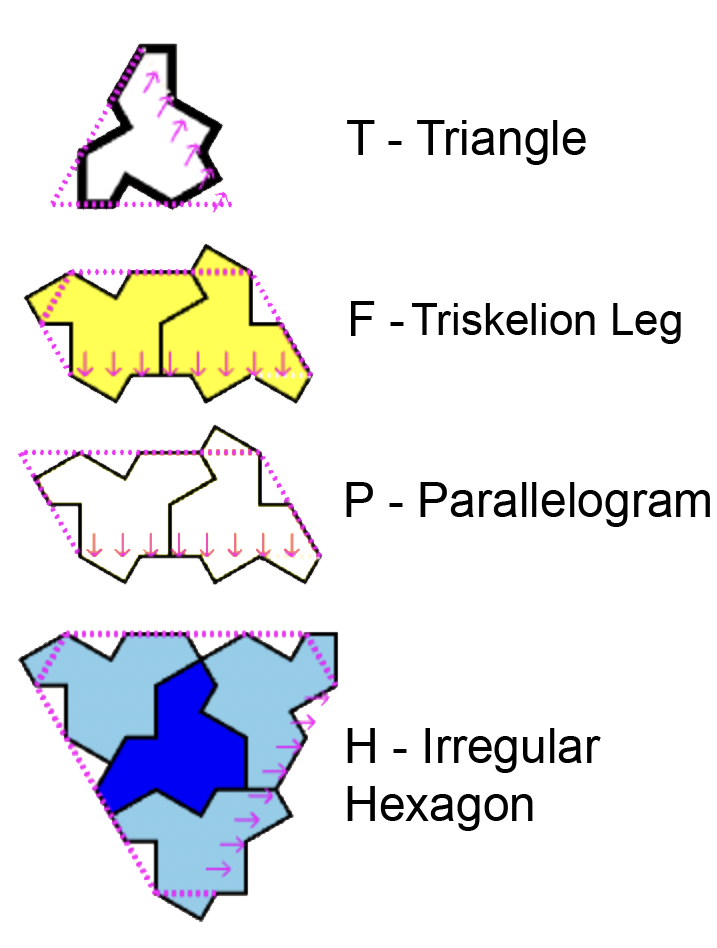
Let's learn the symbols, starting with the Single T whose symbol is a triangle.
Arrows along one edge are for orientation. They indicate the side where two consecutive kites of the T-Shirt will poke out.
Buddies have two symbols: when used in a triskelion they're presented as a pointed, triskelion leg. When not used in this arrangement, their symbol is a parallelogram.
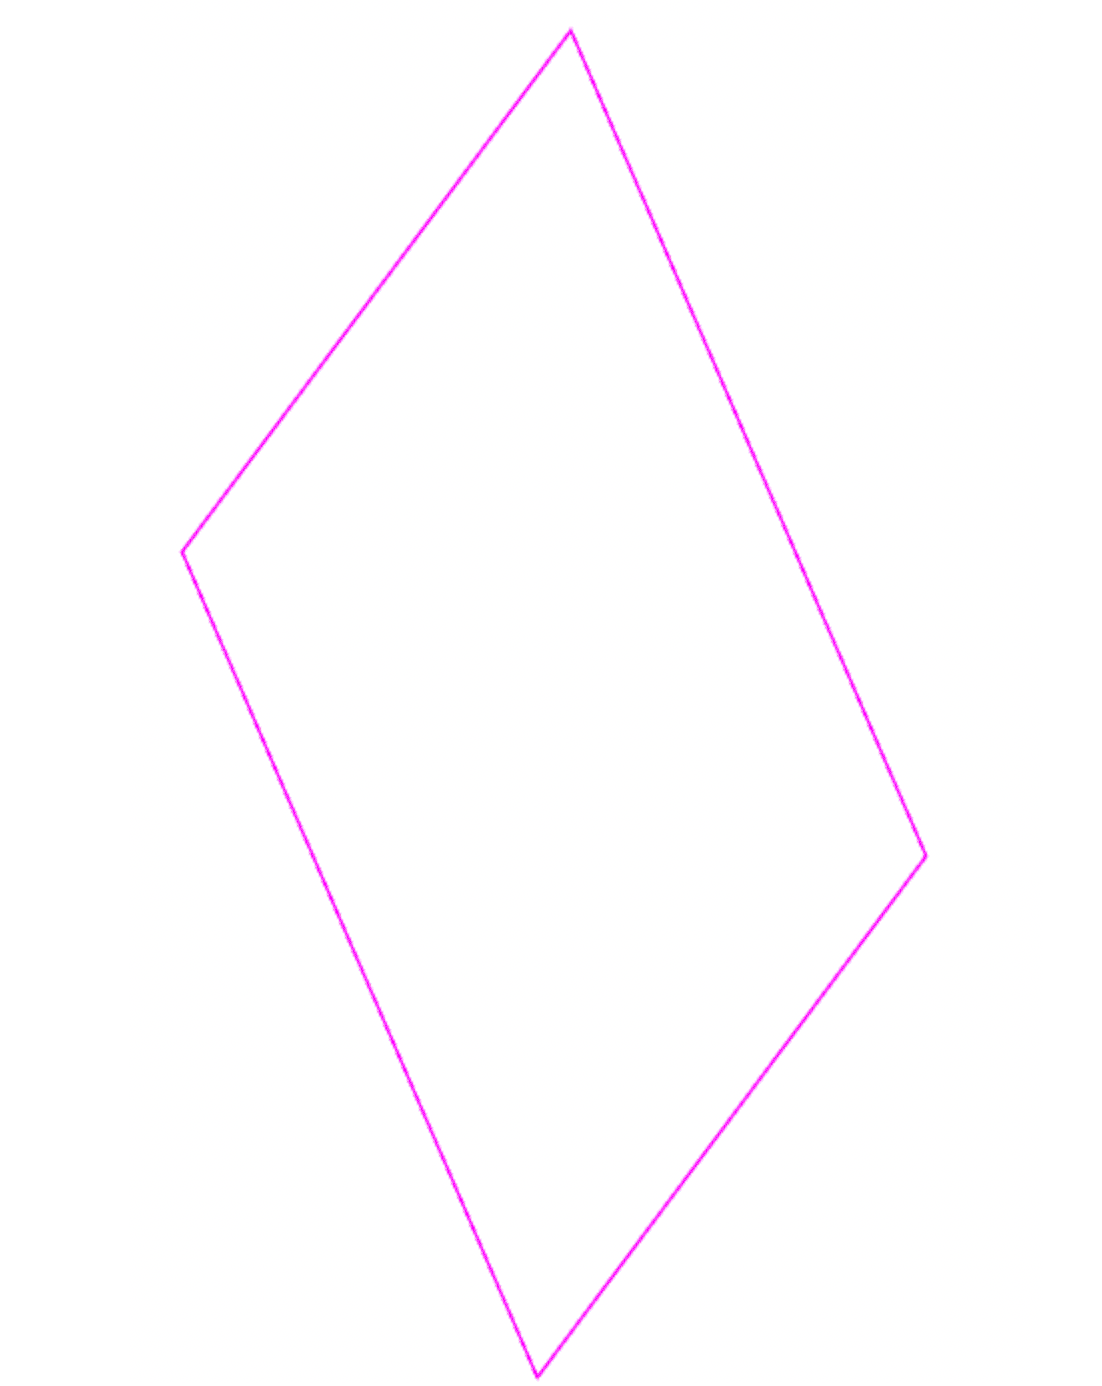
And lastly, the Cluster's symbol is an irregular hexagon.
An Important Detail:
Before moving on, we want to focus for a moment on the little arrows in the shapes we just learned. Without the arrows, we can't tell which way the T, H or P shapes need to be rotated in order to fit together properly. The F shape, with it's point clearly tells which way it is rotated.
In each case, the arrows indicate the side on which two adjacent kites poke through the shape.
This small distinction not only helps with knowing which way to rotate the shapes, but also shows a very interesting property present at any scaling of the T-Shirts made through this process. You can look all around a large group of T-Shirts and you will notice all of the T-Shirts point inwards, except one T-Shirt, in one P-shape, on the outside edge will be pointing outward.

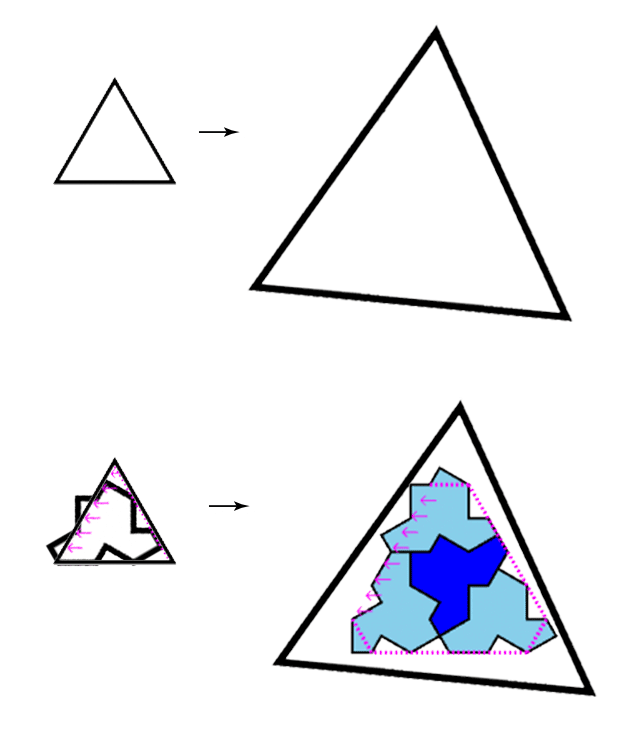
We scale up to more T-Shirts by substituting one of the four basic symbols you just learned for larger combinations of the same basic, four symbols. For example, start with the triangle symbol. As we scale up to a large triangle, the substitution is very simple.
Lesson 12:
The T-Shirts that best fit a small triangle is a single T-Shirt.
The T-Shirts that best fit a large triangle are those forming the Cluster.
So to grow from a small triangle to a large triangle, just replace the single T-Shirt with the Cluster.
Generally the larger shapes are exactly the same shape as their smaller versions. In this case a large triangle and an irregular hexagon are used somewhat interchangeably because they are very similar. Even mathematicians are a little poetic.
Now a more complex one. We saw how a small triangle scaled up to a large triangle. Now the large triangle scales to a super triangle with the substition rules shown below.
Lesson 13:
The best fit for a small triangle was one T-Shirt.
The best fit for a large triangle (or an irregular hexagon) was the Cluster.
The super triangle is filled with familiar shapes. It has three irregular hexagons (always filled by a Cluster), and one small triangle between them, (a single T-Shirt).
The clusters are surrounded by six Buddies, three of which can go on to form triskelions and are represented by the triskelion leg shape, and three of which are disjoint, represented by parallelograms.
Note one disjoint Buddy pair on the right is colored yellow. It's not yet clearly disjoint or part of a triskelion but will be truly disjoint (and white) as we scale up more. Also notice, it is the only one of the six buddy pairs pointing outward.
You probably noticed that within the super triangle there were parallograms and triskelion legs. If you guessed we have to learn how to scale those as well, you are right.
Lesson 14:
The parallelogram scales up to a large parallelogram through these substition rules.
Two irregular hexagons, filled with Clusters, are placed side-by-side.
One parallelogram sits between them. The parallogram shape is filled with a disjoint Buddy pair. This Buddy doesn't know it's disjoint yet, so it's colored yellow, but it will be clearly disjoint when we scale up further and it connects to other Buddies. Then it will be colored white.
The Clusters are flanked on the outside by one triskelion leg on each side. These are also filled with Buddies.

Lesson 15:
And now the final scaling substituion rule for triskelion legs.
This one is remarkably similar to the last. Do you see the difference?

Lesson 15:
That brings us to the last lesson. Now that you know the geometric substitutions, it's really just a matter of applying them "recursively". This means repeatedly applying the substition rules through successive generations.
For example, start with a shape, like the "H", or irregular hexagon. Then apply the subsitution rules. This gives you a new shape composed of smaller shapes (H,T,P and F) we'll call the children of the starting shape. Then apply the substituion rules to the children giving another generation of shapes - the grandchildren. Then apply the rules to the grandchildren and great-grandchildren for as many generations as desired. At the end, put actual T-Shirts inside the last generation of shapes.On this final lesson, the system will lay out the T-Shirts for you. You've earned it! The system will create an "H" and recursively generate its descendents for 4 generations and then fill those great-great-great-grand children with T-Shirts
Press keys 1,2,3 or 4 to toggle on/off the SuperTile shapes at that generation number.
Press the 'z' key to toggle on/off the T-Shirts.
Lesson 16:
Similar to the previous lesson, the computer will do the work here. This one begins with the P or Parallelogram shape and then applies the recursive substition rules through 5 generations.
Press keys 1,2,3,4 or 5 to toggle on/off the SuperTile shapes at that generation number.
Press the 'z' key to toggle on/off the T-Shirts.
Reminder, you can zoom in/out with - and = keys.
And definitely cycle through the color palettes C and cycle through grid line/curve patterns with G
Now you can start with just an empty puzzle canvas and play. Enjoy.
Arrows: Move selected T-Shirts up, down, left or right.
R or T: Rotate selected T-Shirts CCW or CW
F: Flip selected T-Shirts
+,- Zoom in/out
x Delete selected T-Shirts
Double Click Select all contiguous
Ctrl/Cmd - C: Copy selected
Ctrl/Cmd - V: Paste selected
C Change color palette
G Grid lines: hidden, hexagonal kites or Penrose curves
D Show/hide hexagonal grid dots
Save and Load via the buttons in the toolbard
